Tagline

The Studio of Eric Valosin
Showing posts with label Technique. Show all posts

Saturday, October 15, 2016

OOOA Part TwOOOA

The performance date for our "Object Oriented Ontological Actions" crept nearer as I continued to refine my computer vision speech synthesizer project from my last post, The Word That Speaks Itself (Objectless Oriented Program).

I adjusted the variables to locate the hand positions relative to the person's body rather than to the screen itself, which helped account for a variety of user positions near or far from the camera. I also added in the complete array of spoken code, and tweaked the timing of the voices for a closer unison.

Unfortunately I had to manually input all 1478 "words," but I did at least devise a way to automate the process of fitting all those entries into the necessary code blocks. By listing all the items in separate columns of a Numbers spreadsheet, I could copy and paste each element: "speech[__] = '__';" where the first space could be algorithmically numbered and the second space was the respective word in the array. Then I used a formula to merge all the rows into a single column, so that I could copy and paste the whole thing into Pages where I could systematically use Find/Replace to remove the extra spaces and replace the quote marks with straight quotes. Then I could copy and paste into Processing.

Our first performance...


was slated for Gallery Aferro in mid May, and would be followed by a second performance in Brooklyn in June. I met with five of the other participating artists to discuss the framework around the John Zorn COBRA inspired game rules that would dictate the performance.

Everyone's sound objects would be stationed around the gallery, and artists and viewers alike would be able to interact with them. We also contracted a jazz trio as a "house band," which (unbeknownst to them) would play standards and improvise in conjunction with the chaotic cacophony of all the sound objects joining the composition. 

A big, occultish wheel-of-fortune style wheel would then dictate musical rules, including time signature changes, volume or tempo changes, switching instruments, offering a vocalized "prayer," playing blindly by wearing an oversized mask, using a toy sword to cut an instrument out of the music for a time, simulating your instrument's sound a cappella, or manipulating a wooden paddle in whatever less-than-sadistic way the user saw fit. 

These of course became implausibly precise rules that most of the atonal instruments were incapable of following in the first place, and it added to the anarchic anti-structure of the whole ontological experiment.

setting up the wheel and the tables 
My setup, a mac mini, keyboard, and kinect sensor packed into the cabinet of an amp with a monitor on top. The white tape denotes optimal range for interaction.

Some of the other projects included a delay-looped feedback pendulum, contact mics submerged in water with various crystals and rocks, a telegraph-turned-alarm bell, salvaged broken electronics out of which sound is coaxed (including a theramin!), and more.


One of the other artists interacting with my project

Molto-Allegro!

Fortissimo!

Heidi Lorenz-Wettach Hussa's repurposed theramin and other broken electronics


Jamming

There were still several challenges to troubleshoot. The biggest difficulty was programming it to account for all the unexpected variations in environment and interaction. 


I was thankful my program apparently had the flexibility to recognize many unorthodox body shapes, but it often had a hard time detecting users, especially with multiple people in the frame. If their hands went behind their back the tempo would sometimes get stuck in super slow motion, essentially freezing the program. It would also get stuck after loosing a tracked user, not realizing it was no longer tracking them. Often times viewers didn't know if they were being tracked or not. And of course I wasn't thrilled by the shrunken visuals, but I'd need to adjust many of my equations before being able to size up the screen.

All of this thankfully went hand in hand with the provisional, experimental nature of the show. 

Many kinks to work out before...

Off to Brooklyn!

In June we were invited to reprise our performance as a part of the "Summit: Nature, Technology, Self" conference led by the High Focus Institute in Brooklyn's Kilroy Metal Ceiling.

The venue was a gloriously defunct old warehouse, literally falling apart at the seams. It housed the projects of several other collectives and individuals, including prototypes of Terreform One's sustainable food shelters, which I got to see in person just days before I saw news articles popping up about it online!

Many groups held performances of one sort or another, including a DJ, a playwright, and an immersive projection/performance installation that involved an almost alien-mystic enlightenment "interview." It was tongue and cheek and utterly implausible and yet it was maybe the most impactful and stirring performance I've ever engaged with.


Sitting in the Queue to "interview" with the High Performance Institute.

After helping you craft your "resume," (by infusing the objects on the table with your own personal history and ideologies) I'm taken back behind the curtain to speak with his female counterpart. The psychedelic projection landscape enveloping you and the strangely empathic line of questioning slowly turns into a trancelike, swaying dance that may have changed my life. Not even being hyperbolic.

 This time, we substituted our Jazz trio with a Progressive Noise Band out of Philly. The effect was extraordinarily different!


 I reworked my project a bit, building in some textual user feedback on the tracking process to help confused viewers hang in there while it calibrates, and eliminated the perpetual slow motion glitch. Most importantly though, I got it to automatically abort and restart the tracking process when a user left the screen and it thought they were still there. I also built in a fail-safe nuclear option, in which one stroke of the keyboard could be used to reboot the whole program.


And it turned out I'd need it. Though the open space behind my piece's station caused some confusion in user tracking, it worked brilliantly. ...Until our noise band lived up to its name and cranked it up to 12 or 13 (11 is so 80's). 

I still don't know exactly what went wrong, but the leading theory is that the sound vibrations were so intense it disrupted the computer's hard drive and crashed the whole thing. Not just the program, the whole computer. Nothing would do anything. Either that or there were so many amps and instruments producing wonky electromagnetic fields that it too messed with the hard drive. In any case, I spent a solid portion of the performance fighting with the technology and becoming a bystander. At least it had its moment in the sun beforehand, and it added to the anarchic feel of the whole endeavor.

I guess you could say it was a very Object Oriented moment for me, in the truest and most Heideggerian sense, as the tool's malfunctions betrayed the tool to me in all it's glorious Ontological dysfunction. Mission accomplished?

Lots more to figure out before there's ever a third iteration of this project, but until then, if you're interested, here's a link to my full processing code. Feel free to excerpt and adapt, just give credit where it's due.

This was a really fun challenge, and afforded some experiences I likely wouldn't otherwise get, working with the Oculus Collaborative and infiltrating Brooklyn's hipster-grunge experimental music scene. All in the name of Ontology.


<< PREVIOUS POST                           


Processing and FreeTTS speech synthesizer - voice, pitch, tempo, volume control

This summer I participated in an experimental sound art exhibition, and in my quest to create a computer vision based Text-to-Speech sketch in Processing, I discovered there are really no good options out there.

The FreeTTS java library is more than sufficient in theory, but I could not find a Processing friendly wrapper that actually takes advantage of all FreeTTS has to offer.

Luckily, 

deep in the recesses of the Processing forum, the user Kof offered this "messy class called Basnik." in response to another user baffled by the same problems.

Kudos to Kof and his brilliant tutorial. He said to "modify as you need," so I did:
I'm not a polished full-stack programmer by any stretch, but this should get the job done.

Here's a cleaned up, beefed up version of his Basnik class that allows for dynamic control of the voice, pitch, volume, tempo, range, transposition, and more.

  1. Follow his advice and download the FreeTTS speech synthesizer

  2. Put all the .jar files you download inside a folder called "CODE" within your Processing sketch's folder

  3. Open a separate tab in your Processing Sketch and paste in this class:
  4. In your main code, use this as a basic template:
  5. create as many instances of Basnik as you want - you can thread them together to create polyphonic effects, use variables for dynamic control of the voices, and iterate through string arrays ("String[]") of words so you can change those controls mid sentence.

I hope you find this useful. Feel free to use and adapt this and make it even better.

Sunday, May 15, 2016

My Holographic Universe: Part 5/5 Reflections (and Transmissions)

Lest I leave you hanging, I wanted to take some time to reflect back on my week at the Ohio State University Pulse Laser Holography lab. If you're just tuning in, you can follow my adventure from the beginning here.

Our mentor, renowned physicist Harris Kagan was sure to drill in the major rules of holography:

  1. Two beams - you can't have an image without an object beam and reference beam coinciding on the film and creating an interference pattern.
  2. Stability - nothing can move more than half the distance of a wavelength of light (roughly 300 nm) during the exposure or you get a changing (distorted/destroyed) interference pattern

But there were several more lessons to be learned, which I think are transferrable to other disciplines.

  • Everything matters - whether it's which hand you use to load the glass into the film holder, what brand of squeegee you buy (for the record, the perfect squeegee was formerly found at Bed Bath and Beyond for about $9 but has since been discontinued much to the dismay of the holography community), or what object you're imaging, everything has a purpose and a meaning, and nothing is done without consideration.
  • You can do anything, it just takes time - nothing is off limits, it just might take 8 hours of re-machining parts, building structures, and aligning optics to make it feasible.
  • Well, maybe not anything - there are many inherent limitations to the medium. Fuzzy things and living things move on a microscopic level. No matter how still you are, you'll never be stabile enough for a continuous laser image. Shiny objects just work better. But if they're too shiny they won't work at all. Green objects will never be bright under a red laser. Whatever idea you had, assume you'll be tweaking it. However it's these limitations that provide for many of the most interesting and ingenuitive experimental holograms.
  • It's who you know - nothing new, but the holography community is super close-knit. It's like a secret society or a fraternity, in which everyone knows everyone, and it's a small pond filled with huge fish all swimming shoulder to shoulder. We had visitors drive in from several states over when they heard Sam and Harris would be in the same room, just for a chance to get an autograph and talk lasers. Good ol' so-and-so out in Russia? Yeah, I saw him a few weeks ago. He worked with what's-his-name in Japan, right? Yeah, right before I worked with him in NY. He's married to that woman what's-her-face. Oh yeah, I had dinner with her last month at such-and-such. If you can manage to name drop that one holographer you've worked with, they will know who you mean, and you will feel very important for the next 45 seconds. But when you're in the company of holographers talking holography, prepare to be acutely aware of the fact that you are, for now, an outsider graciously being offered a peek into a strange world full of physics jokes, unpronounceable words, and units of measure you haven't thought about since high school. 
  • There are two types of artists - the kind that want to be holographers and the kind that want you to make holograms for them so they can look like holographers. Holographers can smell a poser from a mile away. For instance, I found out the hard way not to mention James Turrell as one of your holography idols. The holography community has a severe distaste for Turrell, who walks into a lab and pays "real" holographers to make him brilliant things. But if you asked him about beam ratios or how exactly triethylalamine filters out selective wavelengths of white light to develop a colored hologram, he'd likely give you a blank stare. While he gets all the glory as a "legendary holographer" the guy who likely invented all the techniques he's using is sitting in a basement in Ohio getting an autograph from Sam Morée.
  • Give up the Pepper's Ghost - holographers are VERY touchy about the colloquial bantering about of the word "hologram." If I had a dollar for every time it was mentioned that Tupac was not a hologram but merely a pepper's ghost illusion (and that holography is not an illusion - it is real wavelengths of light reaching your eye the exact same way they would if the object were there), I'd be able to afford my own lab. Nor are HoloLens or VR technically holographic technologies. Moral of the story, technicalities matter (see bullet point #1)

The Future

As our week rounded to a close, we had the opportunity to ask Sam over dinner and drinks what he sees for the future of holography. Recognizing this is someone who has been innovating and pioneering holographic techniques for the past 35 or so years, I was hanging on his every word.

He feels that the technology of imaging and developing holograms has largely come as far as it likely can. But he sees great potential in attention to the process of viewing them. New lighting technology and new optics research could really revolutionize the way holograms are integrated into life on both practical and artistic levels.

Thinking within the framework of my practice, I'm looking forward to being able to experiment with my existing holograms on these terms. Activating holograms using digital projection rather than lasers or gallery lights, or playing with projecting holograms from a point or line source seem like  promising places to start.

I still have this sneaking urge to attempt a DIY holography lab, but after seeing the fortune spent on legitimate equipment I have serious doubts about realizing that urge.

And ultimately, I'm excited to dream up a reason to propose a return to OSU for a residency.

From left: Harris Kagan, Miho Ogai, Jaccqui Delaney, Zsofi Valyi-Nagi, Sandra Meigs, Jeff Hazelden, Eric Valosin, Sam Morée
For more info about the HoloCenter and the Pulse Laser Holography workshop and residency program, visit the HoloCenter website.

And should you find yourself in Columbus, I'll share the same advice that was shared with me: Go to Jeni's ice cream. Sample everything (I looked down at one point to find 10 tiny spoons in my sticky, clenched fingers), and ask for pairing suggestions. The ice cream will exceed the hype.


And for the record, ice cream is one of the few things in life that is better off not being a hologram.


<< PREVIOUS POST: PART 4                                                                            |<< FIRST POST                

Friday, April 29, 2016

My Holographic Universe: Part 4/5 (the final two days)

Today marked the last day of the Pulse Laser Holography workshop led by renowned physicist Harris Kagan and legendary holographer Sam Moree that I've been fortunate enough to attend at Ohio State along with 4 other phenomenal artists from all over the continent. After having completed our Denisyuk reflection holograms on Tuesday, we brought it all to a close by developing transmission holograms with the pulse ruby laser and making white light viewable rainbow hologram transfers.

I'm sad to part ways with the excellent group of artists I've become so close with over this last week. It's at times seemed to fly by and at other times felt like an eternity; Waiting in the dark for 20 minutes at a time silently or making small talk, 20+ times a day, being mindful of every second passing by, has a way of distorting time. I'll miss the camaraderie of being an extra set of hands for each other as we regularly oscillated between planned lethargy and crisis mode.

Yesterday had many of those crisis mode moments... 

DAY 4

Inside the pulse studio, Jeff Hazelden setting
up his model for the shoot before mine.
The morning started as any other. We gathered, discussed the game plan, and went into the pulse laser lab to set up our installations, one by one. I was the second person out of the five of us to go, and I decided to make another go at my rock pile.

Harris advised that I find a way to take advantage of the pulse laser's ability to image something moving, so I decided to put my rocks in water, and disturb the water by lifting and dripping some handfuls of it. 

I also built a little plank to sandwich between the rocks, projecting forward to hold a second rock pile in front of the larger one behind. This way it would jut forward more in the image and seem to be floating. (and no, I didn't cheat with hot glue. In the spirit of true rock balancing, it's all actually ready to topple at any moment. And often did.) The next step was to fill it with water and practice timing our dripping.


When it was my turn in the lab we carefully disassembled and transported all the components. The we began setting it up, using the mirror as a standing for the film, as a way to line up our composition, raising and lowering the platform with shims and 2x4s, and then carefully loading in about 3 gallons of water by the coffee mug-full so we wouldn't spill water on any of the optics.

Crisis number one came when it slowly occurred to us that the felt strips we used to mask the edges of the tray were wicking the water out of the tray and gradually flooding the floor of the lab. Lasers and water are not a good thing. On top of that, dripping the water would cause us to potentially get in the way of one of the mirrors.

We decided to simply agitate the water with our hands and then jump out of the frame as quickly as possible, and hope there wasn't too much water on the ground. Frantically, we got it all ready.

3 - 2 - 1 - FOOMP!

20 nanoseconds later it's all done.

We even more frantically (but VERY carefully) cleaned up the flooded floor, and dismantled the installation. 

Crisis two came later when someone nearly destroyed another person's hologram by accidentally turning on the yellow lights in the dark room before it had been bleached, which could expose the film and wash out the image. Luckily, somehow, the image wasn't harmed. 

After a very stressful morning of close calls, Harris urged us to break for lunch to recompose ourselves.

...That's when we got the alert about the shooter. 

An armed home invasion that sent two people to the hospital just off of campus, and the perp was on the loose. The school went on lockdown, so we hunkered down in the darkroom with the doors locked, and used the time to develop some film.

Webster developer heated to 104º (stronger and more caustic than the D19 we used for the continuous wave lasers) for about 4-5 minutes, water rinse, bleach, back to the water for 20 minutes, then squeegee and blow-dry. 

We got the notice that the lockdown had been lifted, and my hologram was ready to be viewed.


The setup was a little too high so that from the vantage point of the film you could barely see the water, (which was not nearly as agitated as I 'd hoped) but otherwise it was a really successful shoot.

Each of our holograms got better and better as we went along, and the crises became fewer and farther between.

Eventually, we all finished up, and had some really spectacular masters from which we'd make 4x5" transfers. Sam began setting mine up to be first up for the transfer the next day.

Lining up the master on the front plate to be projected onto the rear plate with a line source (i'll explain below), where the film would be.

The projected image (sideways)
We finished relatively early (that is, not late), and I got back to my host's house just in time for a really great, small party thrown somewhat in my honor. Conversation ranged from holography to foodies to pinball machine repair, to defecation performance art, and I was stunned that not a single one of those topics was any less technical or conceptually rich than any other!

DAY 5

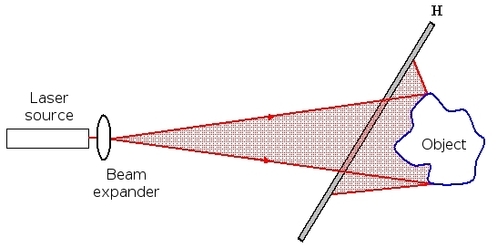
Today we returned for our final day. I was first up for the transfer. The way it works is this: Since every point on the hologram contains all the information for the light scattering off that object and going to that point, you can shine a point source laser through the hologram and end up projecting the entire scene onto the wall. As you move the point around, the vantage point of the projected image moves around accordingly.

Lines and Rainbows:

Instead of shining a point, if you use a cylindrical optic to spread the laser into a line, that line will project the whole image (as seen above) and it will retain all the info for all the vantage points along that line. That gives you a projected image that you can walk past and get the 3D parallax effect. On top of that, the slit aperture of the line source causes white light to spread, creating a rainbow hologram when viewed in white light.

Then, by calculating the focal distance for each 3D portion of the image, you can place the film in the right location to get the transferred image to appear to sit anywhere in space you'd like in relation to the film.

In mine, the rear rock pile sits behind the picture plane (what's called a "virtual" image because it's focal point occupies space that does not physically exist), while the front rock pile appears to just out in front of the picture plane (a "real" object with a focal point in real space in front of the image)

You're then essentially taking a holographic image of a projected holographic image, using that projection as the object beam that mixes with the reference beam to create the interference pattern.

Exposure

Since the optics were already set up the night before (see diagram), all we had to do was fine tune some things, turn off the lights, and load the film between the panes of glass on the rear part of the projection apparatus. 

The trick was simply to pick the right spot for the film, since our "window" would be shrinking from 5x14" to 4x5"

Then we wait 30 minutes for it to settle and become stable, tell stories, and figure out our game plans for the exposure - set the timer, lift the card blocking the laser off the table for a minute, uncover the beam entirely and try not to move, breath, or make any sounds, and pray the construction workers upstairs don't decide to start hammering, and watch for 2.5 minutes, then cover the beam again.

Development

Then it's off to the darkroom. It was pretty cool to actually get to the point where we felt we could handle it all by ourselves, without Sam or Harris looking over our shoulder. We all helped each other remember all the steps, and we all had enough experience by this point to be able to coach each other through any minor problems.

And ultimately it turned out fantastically. The only issue was a mysterious streak across the top of the image, but the hologram still developed, meaning the streak couldn't be from a messy object beam. We couldn't find anything in reference beam that could be causing it to overexpose. I thought I might have somehow exposed my film while loading it, but when we saw the same line in everyone else's film too we deduced the it was actually a defect in the roll. Big bummer for the roll, but it was reassuring to me!

Viewing

Since these are transmission holograms (meaning both the object beam and the reference beam collide on the same side of the film) they need to be illuminated from behind (with what's called a "conjugate beam") in order to be viewed. That's why transmission holograms that are hung on walls are actually mounted on mirrors, because it reflects the front mounted lighting back out as if it were coming to the viewer's eyes from behind the film.

Once it was mounted up, we took a look in the white lights, and voila!


I was extremely proud of all of our holograms, and perhaps even more so with everyone's patience through all the waiting, crises, and confusing physics lessons. Tomorrow, after a good night's rest, I suppose I'll take a moment to reflect back and wrap this all up into a nice tidy bow.

But for now, it's time to get some sleep on my last night in Ohio before making the trek back to Jersey in the morning. It's been quite a ride!


<< PREVIOUS POST: PART 3               |<< PART 1                     NEXT POST: PART 5 >>


Wednesday, April 27, 2016

My Holographic Universe: Part 3/5 (My first hologram!)

It's now the end of day 3 of the Pulse Laser Holography workshop at Ohio State. I'd have posted yesterday for day 2, but the days have essentially just bled together into one long super-day.

It started like this...

DAY 2

We started the morning with more theory: transmission vs. reflection (whether the object and reference beams hit the same or opposite side of the film), how the silver emulsion works (grains of silver standing up when light hits them), the optics themselves (mirrors and lenses accurate to within a 10th of the wavelength of light!), film resolution (3,000 grains per cm! That's equivalent to a 4x5 photo with a gigabyte of data stored in it!)...

After a while my brain started to feel like the whiteboard in the lab:


And just when I thought I had finally gotten a handle on it, Sam or Harris would say something that totally undermined the understanding I thought I had. But eventually (I think) we started tracking with them, just in time to get some first hand experience.

We went 2 doors down to the pulse laser. As a frame of reference, our first demo with the smaller helium neon laser on Day 1 required a 4 minute exposure. The ruby pulse laser is so powerful it needs 20 billionths of a second to do the same thing!

We decided on a group pose trying to chew gum and blow bubbles in each other's faces. After countless trial runs to get the timing down (like getting a group to all jump in the air for a photo at the same time), we set up the laser and got ready for showtime...

...And failed miserably. Only 2 people had viable bubbles, and they were mostly out of the focal area. But at least we got a nice shot of us making awkward faces at each other!


Test viewing while still wet. I never got a video of the final mounted version... maybe tomorrow. That's me in the bottom right corner, just after the premature bubble pop.

After developing the film using a whole bunch of processes and chemicals that wouldn't make any sense for another day or so, we broke for lunch (more like dinner at that point), and then rounded the day off with a lecture from Sam about his artwork and role in the history of art holography since the 70s. We were joined by OSU's beginner holography class.


DAY 2.5ish

That night, (after a bit of a diversion forgetting where I parked and spending an hour scouring the wrong parking lot) it was time for me to build the object for the next day's Denisyuk hologram, which had to fit within a 5x7x1.5" box.

I had gotten all the supplies earlier that morning, and the plan was to construct a 3D scannable QR code using nails in a wood board (pinpression style). I thought it would be really interesting to be able to move around this topographical, waveform/interference-pattern-like image that coheres into a QR code at just the right angle, then scan a hologram with your phone and be sent to a website.

This did not go how I planned.

First, the wood was too thick and wouldn't fit in the box. So I had to use my little hand saw to plane it in half! 

Amazingly, that's the one part of this that did work, though it took me about 2 hours.

And in case you were curious, the sound of a saws-all through wood apparently sounds just enough like a frog's mating call to attract visitors!

My pet frog for the moment, who hung
out next to my chair watching me saw!
The problems started to come after I hammered in the first row of nails.

It quickly became apparent that hammering in a nail butted up agains another nail at varying heights (which mean snipping the nails to make them shorter) was not going to be easy with a big, clumsy hammer. I figured out a method that worked using a hole punch to extend the nail, but getting them all at the right angle and location proved quite a challenge.

It also became quickly apparent that I'd need about a week to get this thing finished, and it had to be ready in about 9 hours. 2:00 am. and I had about 2.5 rows down, 23.5 more to go...


I abandoned plan A, figured I'd call it a night, get up early and start sloping the nails down toward the surface, and just draw the rest of the code.

However, with the wonky gridlines started by the uncooperative nails, this got real sloppy real fast.


And even in its best moments, it was simply not scannable. Which also meant it had a 0% chance of being a scannable hologram. Goodbye, plan B.

So I decided to turn it into a meditation on my frustration with the uncooperative materials. I'm thinking of calling it "Meditation on Disrupted Meditations" or "Deconstruction of a Failed QR, Reconstructed"

I added a bunch of leaning and toppling screws, chewed up some of the edges, and glued down my two least cooperative tools.

If it wasn't going to be strong conceptually, at least it would make for an interesting object!


...And it Did! DAY 3

That brought me right up to the start of class where we'd be imaging our objects. The Denisyuk is a reflection hologram named for its inventor, in which  the reference beam passes through the film to the object behind it, reflects off the object and bounces back, hitting the back side of the film with the object beam. This changes the orientation of the interference pattern, and allows it to be illuminated from in front (i.e. gallery lighting).

This, only we added a mirror rather than a direct path to the beam expander.

Of course we started off the day with more theory: learning about how path length differences can be used to selectively interfere with and cancel out all but a desired wavelength within white light. This lets the hologram be viewed with white light instead of needing a laser.

When the white light reflects off the film, ordinarily it would separate into a smeared rainbow. But with a chemical called TEA (triethylalamine), you can make the emulsion thicker, changing the path length of the transmitted and reflected white light. Then, when you remove the tea and the film shrinks back down, you've effectively cancelled out all the wavelengths except the one you want - any given color.

In short, white light => yellow image, not smeared rainbow.

Then each of the five of us took turns putting this all into practice. Our heads were swimming with all the steps:


  • Setup the table and align the lasers (this was done for us from prior days)

  • My object in the Denisyuk box
    • Mount your object in the box (with copious amounts of hot glue for stability)
    • Clean the glass that will hold the film
    • Turn off lights (turn on safe green lights)
    • Find the side of the film with the emulsion (touch it to your wetted lip and find the sticky side)
    • Soak the film in TEA, emulsion side up
    • Squeegee dry
    • Mount the film between glass panes in the box, emulsion side down
    • Stabilize the glass with putty
    • Prepare the chemicals for developing
    • Wait 20 minutes for film and table to stabilize
    • Tell stories (very important)
    • Lift card blocking the laser for 1 minute to stabilize the table
    • Remove card completely and expose film for 10 seconds
    • Don't breath, move, or loose count
    • Replace card to block laser
    • Bring film to dark room
    • Agitate in Developer solution for 2-4 minutes until 80% opaque black, emulsion side up
    • Rinse in water 5 times
    • Agitate in bleach for roughly 5 minutes until clear
    • Rinse 5 times
    • Soak/rinse in water for 15-20 minutes (roughly 3x the amount of bleach time)
    • Soak in Vitamin C solution until brown
    • Squeegee dry, check for streaks
    • Blow dry until it curls up in the opposite direction

    Sam helping me mount my object (left) - Really
    an honor to get to work with him;
    Aligning the laser (above): 


    Our ritual story telling area

    Rinsing off the bleach in the darkroom

    And then if all has gone well, you have a hologram!!

    Mine turned out a bit cloudy - We figured out that we think there wasn't enough developer in the tray (mine took almost twice the time it should have to turn black) and not enough time in the Vitamin C, which helps remove some cloudiness.

    But all in all, I'm pretty pleased!

    My very first hologram!

    And one by one we each got them all completed. I was fortunate to go second and get the anxiety of destroying my image out of my system early. However, the last two people's really turned out fantastically as we all started to better understand the process and help each other out.

    Zsofi's pyrite

    Jeff's blue pseudoscopic buddha (a relief impression of the object, imaged, and then viewed from the "wrong" side, inverting the hologram and making it pop out orthoscopically.)


    Next, Onward to our very own misadventures with the pulse laser, then transferring the pulse masters to holographic prints!