As I've embarked on a Lenten quest to reacquaint myself with practices of spiritual and physical self-care, I've taken up an experiment in mindfulness. As I heard testimonies to its mental health benefits and recounted my own previous successes, I began pondering why mere mindfulness (watching your own thoughts) should lead to overall calmness and assurance at all. (For a great video on mindfulness meditation that sparked this all, see my G+ post here [if that doesn't work, see the original post here]) As a relative novice in the field, I'd love to hear any thiughts of those more deeply entrenched in contemplative practices. However, neophyte that I am, I had a simple epiphany: it occurred to me that mindfulness transforms us because it is an exercise of acceptance.
At least in my case (and in others, I've been told), eventually one finds that it's nearly impossible to truly control or empty all your thoughts. And so it becomes less an exercise of control and more one of learning to embrace a certain lack of it (which paradoxically is a major gain of it). When we recognize we cannot control that which we feel like we most aught to be able to (our own thoughts), we by necessity begin to watch, accept, and even love their uncontrollable eccentricities. How much more then will that attitude translate to things over which we already know we have little control anyway (events, people, and circumstances outside our minds). The internal dialogue translates to a general, external attitude of radical acceptance.
This is the "detachment" (abgescheidenheit) mystics like Meister Eckhart preached, or the detachment (gelassenheit) Martin Heidegger said allows things to even show up as things at all, phenomenologically. It's not a lack of love or passion for things, but a rather a true acceptance of things as they are, even when we can't control them; even when they happen to be in our own mind. Detachment from control, judgment, and preconception, to simply let things be things.
So what of social activism? Does this acceptance mean we can't change things? Can't right injustices? Far from it. It means our actions are fueled not out of bitterness and disgust (contempt for a thing as it is), but out of hope and love for what could be (acceptance of a thing and it's potentials). We see a wrong, accept it as what it is (a wrong), also accepting our own emotions and desires as what they are, and then choose our actions in order that the thing as it is might become a better thing. It's a delicate distinction that gives a sort of meta-level perspective that should allow us to operate from a more rational, patient, assured, persistent place (especially as it helps us accept our own shortcomings as we try and fail and try again; as one Zen master put it, even repeatedly failing to have a Zen experience can be a Zen experience!). It is in this way that Eckhart asserts that Contemplation is not a quiet, static, internal state but a lively, active event that permeates our daily lives.
This, by the way, is the only way to truly encounter God in any mystical sense - for only when we accept God for what God is - on God's own terms - letting God be God (even when that's unfathomable and uncontrollable), will God show up as God at all.
Wednesday, March 26, 2014
Friday, March 21, 2014
LED Cross Fade
As I've been working on my computer meditation for() loop project, the next step was to get the LED colors to fade from one to the next, rather than snapping right from one color to the other. This seemed like it should be really simple, but it proved to be rather challenging. Getting each color of the RGB LED to transition simultaneously, and at a controllable speed was the tricky part. (getting them to transition one after another was not too hard).
I looked online and couldn't find much of use that was versatile enough, except for this Arduino example which frankly just seemed way more complicated than it needed to be. However, I was able to use it as a template to create a much more concise version that allows the user to input not only the starting and ending colors, but also the duration and smoothness of the fade. I hope this is helpful to anyone who might be looking for something similar...

I looked online and couldn't find much of use that was versatile enough, except for this Arduino example which frankly just seemed way more complicated than it needed to be. However, I was able to use it as a template to create a much more concise version that allows the user to input not only the starting and ending colors, but also the duration and smoothness of the fade. I hope this is helpful to anyone who might be looking for something similar...
 |
| (Scroll to the bottom of the post for code you can copy and paste. If that's not working for whatever reason, you can find it here) |
In the mean time...
A nice little package fortuitously arrived at my doorstep yesterday
 So... I upped my pushbutton prayer bead prototype (see my prior posts in the link above if that makes no sense to you) to include 5 buttons, confirming that the process used to coordinate 2 and 3 buttons will work indefinitely!
Thursday, March 20, 2014
Pushbutton Progress
I've made a few more advances in my pushbutton prayer beads project. (follow it from the beginning here) When last I posted, I left with a few lingering questions - the first of which was how to highlight the pixel on the reference image that was being displayed in the right hand image and LED. I managed (with some more complex algebra than I was expecting to have to use) to write a formula that would convert the selected pixel's location in the pixel array to it's actual x and y coordinates in the image itself. Then I multiplied those figures (to scale up the pixelated image to the size of the output window) and drew a box around that resized pixel in yellow. After some quick troubleshooting and reformulating, I got the box to sync up with the LED and pixel:
The second question was how to daisy-chain the pushbuttons together. In my prayer bead string of buttons, I wanted to be able to differentiate between having hit the same button twice and moving to the next button in the sequence. My solution was to make two strings of buttons ending in two input pins and then alternate the button strings so that the inputs would sequentially alternate. For this I assumed I had to use Normally Closed buttons, since the circuit would have to run all the way to the last button in the sequence and be broken by any of them along the way.
I didn't have any NC buttons, so I decided to make my own (a circuit closed temporarily by a movable conductive object), but my breadboard was occupied by my other prototypes. That's when I remembered that graphite is conductive! Who needs breadboards?

As I was trying things out, I discovered that the legs directly across from each other on the Normally Open pushbuttons I had were actually completed circuits, and that pushing the button would actually connect the two parallel sets of legs to each other, which means that I can link the NO buttons to each other after all without worrying about the circuit being constantly broken. It's like railroad tracks; the two parallel tracks just don't connect until any one of the buttons is pressed (and lays down a cross tie? Ok, no more railroad metaphors.) Here's my drawn graphite prototype in action.
Then I translated that to my breadboarded prototype, and we have our first chain of buttons (both doing the same thing to control the LED). I lastly took that one step further and wrote the code to accommodate 3 buttons in a series, alternating the two circuits, and accounting for whether the current button pressed is part of circuit 1 or 2. This way, the pixel is only advanced if the button pressed is the next button in the series. If the user presses the same button twice it merely repeats that same pixel.


See the next bit of progress here...
The second question was how to daisy-chain the pushbuttons together. In my prayer bead string of buttons, I wanted to be able to differentiate between having hit the same button twice and moving to the next button in the sequence. My solution was to make two strings of buttons ending in two input pins and then alternate the button strings so that the inputs would sequentially alternate. For this I assumed I had to use Normally Closed buttons, since the circuit would have to run all the way to the last button in the sequence and be broken by any of them along the way.
I didn't have any NC buttons, so I decided to make my own (a circuit closed temporarily by a movable conductive object), but my breadboard was occupied by my other prototypes. That's when I remembered that graphite is conductive! Who needs breadboards?
As I was trying things out, I discovered that the legs directly across from each other on the Normally Open pushbuttons I had were actually completed circuits, and that pushing the button would actually connect the two parallel sets of legs to each other, which means that I can link the NO buttons to each other after all without worrying about the circuit being constantly broken. It's like railroad tracks; the two parallel tracks just don't connect until any one of the buttons is pressed (and lays down a cross tie? Ok, no more railroad metaphors.) Here's my drawn graphite prototype in action.
Then I translated that to my breadboarded prototype, and we have our first chain of buttons (both doing the same thing to control the LED). I lastly took that one step further and wrote the code to accommodate 3 buttons in a series, alternating the two circuits, and accounting for whether the current button pressed is part of circuit 1 or 2. This way, the pixel is only advanced if the button pressed is the next button in the series. If the user presses the same button twice it merely repeats that same pixel.
[pic of breadboard]
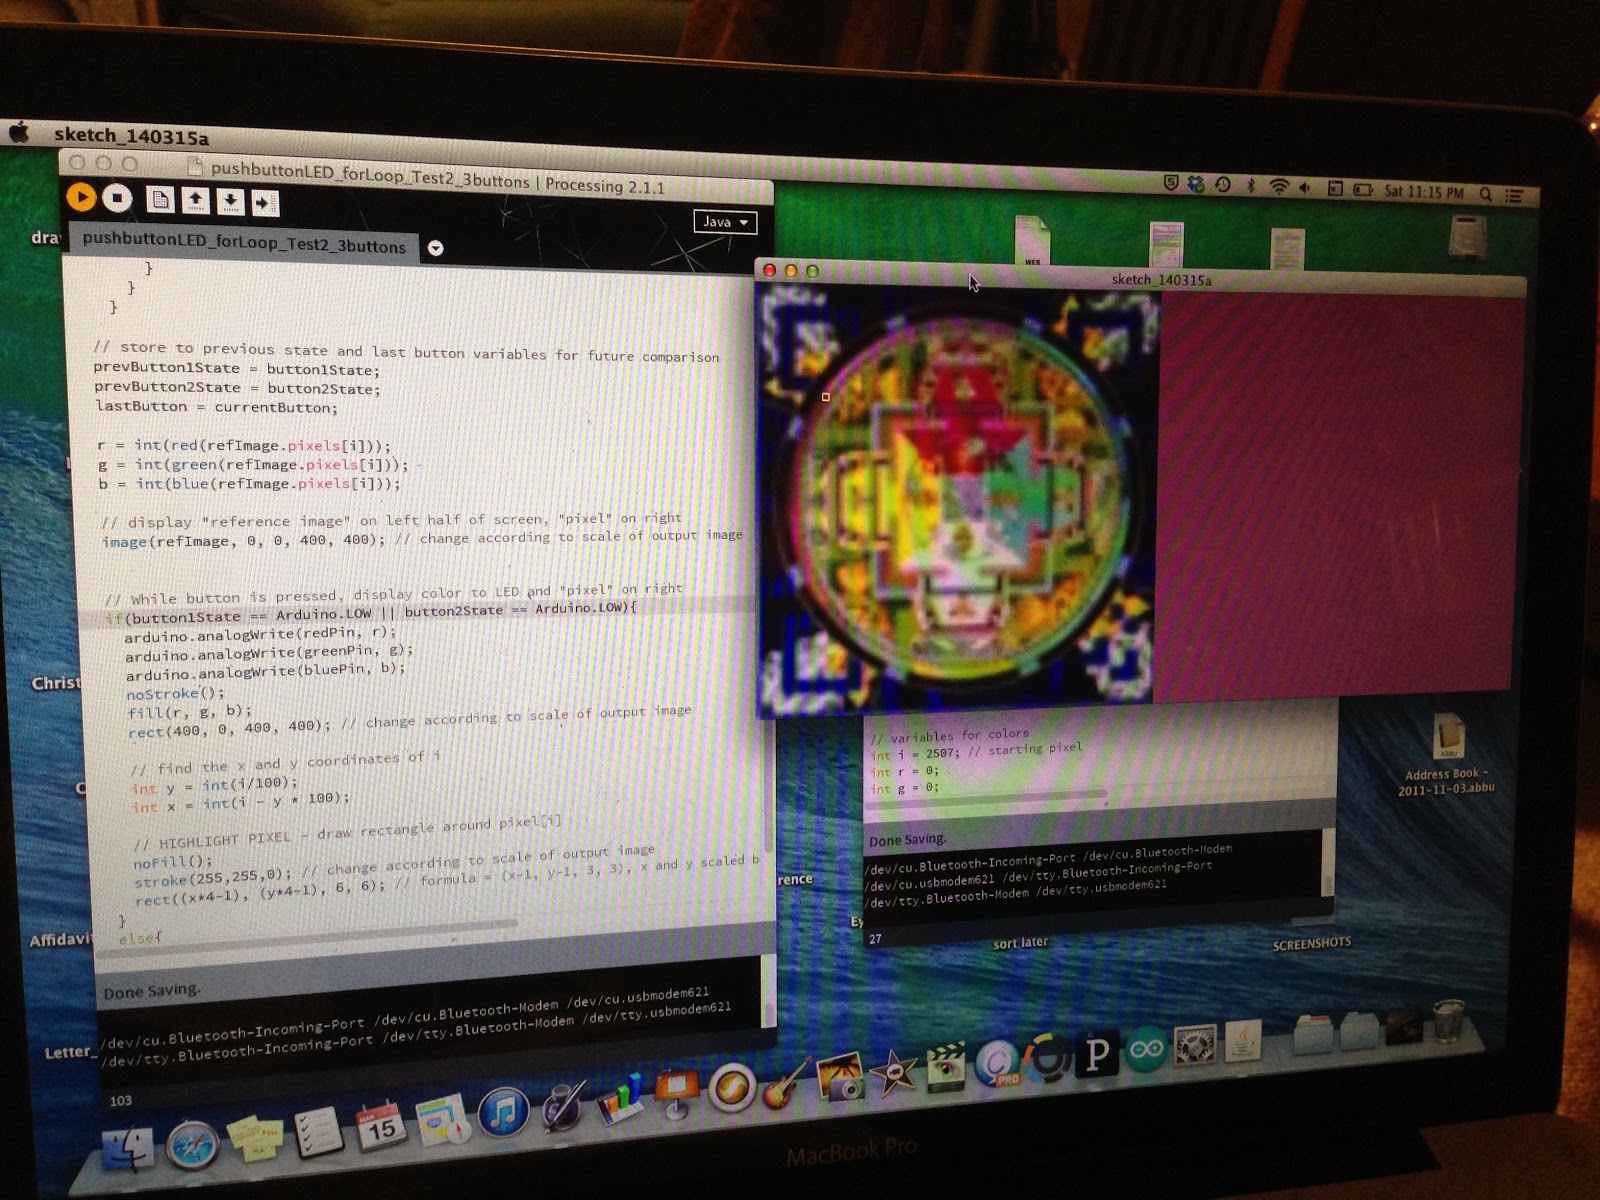 |
| notice the tiny yellow square highlighting the pixel in the pink ring towards the top left quadrant of the image |
Tuesday, March 11, 2014
En-light-ening Imagery.
Some more progress on my Pushbutton Prayer Bead For() Loop Computer Meditation project.
(lightspeed recap [pardon the pun]: a for() loop is like the meditative rosary prayer of a computer. I'm trying to make prayer beads where each bead is a pushbutton that "meditates" on the color of a pixel in an image, looping through the whole image in a sort of computerized rosary prayer, and filling the room with that color as you go)
My original plan was to use pushbuttons to control the color of the light in a room through the use of LEDs, but it suddenly occurred to me... I may not even need a bazillion LED's like I feared (though I might go that route anyway). I could theoretically output the color to a processing display window that is merely flooded into the room via digital projection instead of physical lights. The only hang up would be networking multiple projectors if one doesn't cut it, which I don't quite know about yet. Stuff to ponder...
...but in any case...
I can now control both the color of the LED and the color of the "pixel" on the screen by use of the pushbutton switch (cycling between 3 colors - I chose red green and blue for ease of troubleshooting)
Next, to make it cycle through the actual colors of the pixels in an image instead of pre-chosen colors. for this test, I chose a 100x100px thumbnail of my Meditation 1.1 drawing, and wrote a code to manually loop through every pixel (replicating the automated process of a for() loop), advancing one pixel every time the button is pressed. The RGB of that pixel then gets output to the "pixel" on the right side of the screen and the LED (though they all look slightly bluish in this video).
In my next studio session with this project I'll be looking to somehow highlight on the leftmost image what pixel is being displayed, and then maybe play around with easing in/out of the color (rather than it disappearing suddenly when the button is released).
Getting there, slowly but surely!
Go to my Next post for this project
Tuesday, March 4, 2014
How Computers Meditate: A New Project
For() Loop Meditation
In programming, a "for loop" is a way of performing an operation on a series of items. For example, looking at every individual pixel of an image, one after another, and doing something to each of them. It goes something like this:for(x=0; x<100; x++) {
pixels[x] = color(255);
}
Transliterated to english:
for every integer (starting with 0; and going up to 100; incrementing 1 after each time) {
look at the corresponding pixel assigned to [that integer] and set = it's color (to white);
}
To look through a whole image, you'd have to include the y dimension as well as the x, but you get the idea: You look at a pixel, do something to it, move on to the next pixel and repeat until you reach the end. The more I thought about this, the more I felt like the computer program was almost meditating, completing a mantra, repeated for every pixel it looped through... a for() loop is a computer meditating!
Now then, for a temporary non-sequitor:
I took a trip to the Rubin Museum, where they had an exhibit of Tibetan Prayer Beads, and began studying the theory behind them - why 108 beads, how they're used, what materials amplify prayers to what degree, etc. I'll share a bit of their enlightenment with you:


Imagine:
for(bead=0; bead<108; bead++){
sayPrayer();
}
Pushbutton Prayer Beads
I wondered if there could be a way to meditate on an image, pixel by pixel, by using "prayer beads" made of pushbuttons. Every bead's button advances you to the next pixel. Perhaps the room even fills with light the color of that pixel when you press the button. Even more, maybe that pixel then gets assigned a random size and location on a wall and gets projected into a random collage, reconfiguring the image (starting to tap into the mystical, apophatic deconstruction of the image - knowing it less as you know it more...). Maybe the image in question is even derived from a live snapshot of the viewer himself...


Pushbutton Prototypes
For the end result, since I will want the signal to run through the chain of buttons to whatever button in the series happens to trigger the change, I'm guessing I'll probably want NC pushbuttons (Normally Closed; pressing them breaks the circuit) instead of the standard NO (Normally Open; pressing them completes the circuit). Otherwise the circuit will always be broken by all the buttons except the one in play. Don't have any of those right now though, so I decided to get started with some very basic pushbutton prototypes.


2) Using a microcontroller for this seemed like overkill, but it afforded me the opportunity to learn about pull-up resistors and other stuff that will come in handy when its no longer overkill later. But I wanted to see if I could back up a bit and do the simpler task: prove my understanding of the circuitry by bypassing the microcontroller. So I made a simple pushbutton circuit (hooked up to a battery instead) that would turn the LED on if the button was pressed. No fancy logic statements for the coordination of two buttons, but it worked, so I felt reassured about moving on!
 |
| technically I really don't know if the resistor used is the appropriate strength. I didn't do the math (nor claim to really understand how to... Ohms law is still a hypothesis in my mind...) but I know LEDs can handle a range of voltage so I wasn't too worried about blowing it out. |

And of course my wife just informed me this was all stuff she learned in high school science (I blame a new system in middle school that placed me in the wrong math track for the rest of my academic career)! Well, better I catch up now then! (For the record, I know this stuff is elementary and did learn it quite early on. I think it's the practical application I missed out on)
3) Now to see if I can write a sketch to control the color of an RGB LED and cycle through the colors based on the push of a button. First, a sketch equivalent to the first one controlling the red LED, but where each RGB value could be manually input.


4) Finally, modifying that sketch so that the RGB values are indexed as options of a switch case function, and each button press cycles through those options. Here I selected 3 random color combinations to cycle through.
 |
| Added a switch case with 3 possible RGB values, and then a Button State Change function that switches between case options whenever the button is first pressed. |
Hopefully these are the beginning steps to then populating that list of possible colors from the pixels of an image, and then stringing enough lights together for a big effect, and enough buttons together for prayer beads! To be continued
Subscribe to:
Posts (Atom)