It started like this...
DAY 2
We started the morning with more theory: transmission vs. reflection (whether the object and reference beams hit the same or opposite side of the film), how the silver emulsion works (grains of silver standing up when light hits them), the optics themselves (mirrors and lenses accurate to within a 10th of the wavelength of light!), film resolution (3,000 grains per cm! That's equivalent to a 4x5 photo with a gigabyte of data stored in it!)...
After a while my brain started to feel like the whiteboard in the lab:

And just when I thought I had finally gotten a handle on it, Sam or Harris would say something that totally undermined the understanding I thought I had. But eventually (I think) we started tracking with them, just in time to get some first hand experience.
We went 2 doors down to the pulse laser. As a frame of reference, our first demo with the smaller helium neon laser on Day 1 required a 4 minute exposure. The ruby pulse laser is so powerful it needs 20 billionths of a second to do the same thing!
We decided on a group pose trying to chew gum and blow bubbles in each other's faces. After countless trial runs to get the timing down (like getting a group to all jump in the air for a photo at the same time), we set up the laser and got ready for showtime...
...And failed miserably. Only 2 people had viable bubbles, and they were mostly out of the focal area. But at least we got a nice shot of us making awkward faces at each other!
After developing the film using a whole bunch of processes and chemicals that wouldn't make any sense for another day or so, we broke for lunch (more like dinner at that point), and then rounded the day off with a lecture from Sam about his artwork and role in the history of art holography since the 70s. We were joined by OSU's beginner holography class.

DAY 2.5ish

That night, (after a bit of a diversion forgetting where I parked and spending an hour scouring the wrong parking lot) it was time for me to build the object for the next day's Denisyuk hologram, which had to fit within a 5x7x1.5" box.
I had gotten all the supplies earlier that morning, and the plan was to construct a 3D scannable QR code using nails in a wood board (pinpression style). I thought it would be really interesting to be able to move around this topographical, waveform/interference-pattern-like image that coheres into a QR code at just the right angle, then scan a hologram with your phone and be sent to a website.
This did not go how I planned.
First, the wood was too thick and wouldn't fit in the box. So I had to use my little hand saw to plane it in half!
Amazingly, that's the one part of this that did work, though it took me about 2 hours.

And in case you were curious, the sound of a saws-all through wood apparently sounds just enough like a frog's mating call to attract visitors!
 |
| My pet frog for the moment, who hung out next to my chair watching me saw! |
It quickly became apparent that hammering in a nail butted up agains another nail at varying heights (which mean snipping the nails to make them shorter) was not going to be easy with a big, clumsy hammer. I figured out a method that worked using a hole punch to extend the nail, but getting them all at the right angle and location proved quite a challenge.
It also became quickly apparent that I'd need about a week to get this thing finished, and it had to be ready in about 9 hours. 2:00 am. and I had about 2.5 rows down, 23.5 more to go...
 |  |
 |  |
I abandoned plan A, figured I'd call it a night, get up early and start sloping the nails down toward the surface, and just draw the rest of the code.
However, with the wonky gridlines started by the uncooperative nails, this got real sloppy real fast.
 And even in its best moments, it was simply not scannable. Which also meant it had a 0% chance of being a scannable hologram. Goodbye, plan B.
So I decided to turn it into a meditation on my frustration with the uncooperative materials. I'm thinking of calling it "Meditation on Disrupted Meditations" or "Deconstruction of a Failed QR, Reconstructed"
I added a bunch of leaning and toppling screws, chewed up some of the edges, and glued down my two least cooperative tools.
If it wasn't going to be strong conceptually, at least it would make for an interesting object!
However, with the wonky gridlines started by the uncooperative nails, this got real sloppy real fast.
 |  |  |

So I decided to turn it into a meditation on my frustration with the uncooperative materials. I'm thinking of calling it "Meditation on Disrupted Meditations" or "Deconstruction of a Failed QR, Reconstructed"
I added a bunch of leaning and toppling screws, chewed up some of the edges, and glued down my two least cooperative tools.
If it wasn't going to be strong conceptually, at least it would make for an interesting object!
...And it Did! DAY 3
That brought me right up to the start of class where we'd be imaging our objects. The Denisyuk is a reflection hologram named for its inventor, in which the reference beam passes through the film to the object behind it, reflects off the object and bounces back, hitting the back side of the film with the object beam. This changes the orientation of the interference pattern, and allows it to be illuminated from in front (i.e. gallery lighting).
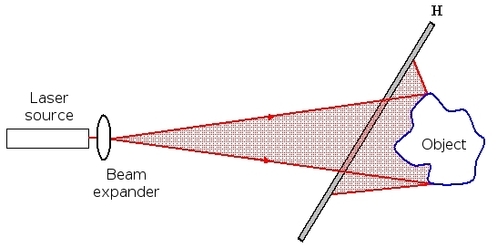 |
| This, only we added a mirror rather than a direct path to the beam expander. |
Of course we started off the day with more theory: learning about how path length differences can be used to selectively interfere with and cancel out all but a desired wavelength within white light. This lets the hologram be viewed with white light instead of needing a laser.
When the white light reflects off the film, ordinarily it would separate into a smeared rainbow. But with a chemical called TEA (triethylalamine), you can make the emulsion thicker, changing the path length of the transmitted and reflected white light. Then, when you remove the tea and the film shrinks back down, you've effectively cancelled out all the wavelengths except the one you want - any given color.
In short, white light => yellow image, not smeared rainbow.
Then each of the five of us took turns putting this all into practice. Our heads were swimming with all the steps:
Setup the table and align the lasers (this was done for us from prior days)
And then if all has gone well, you have a hologram!!
Mine turned out a bit cloudy - We figured out that we think there wasn't enough developer in the tray (mine took almost twice the time it should have to turn black) and not enough time in the Vitamin C, which helps remove some cloudiness.
But all in all, I'm pretty pleased!
And one by one we each got them all completed. I was fortunate to go second and get the anxiety of destroying my image out of my system early. However, the last two people's really turned out fantastically as we all started to better understand the process and help each other out.
When the white light reflects off the film, ordinarily it would separate into a smeared rainbow. But with a chemical called TEA (triethylalamine), you can make the emulsion thicker, changing the path length of the transmitted and reflected white light. Then, when you remove the tea and the film shrinks back down, you've effectively cancelled out all the wavelengths except the one you want - any given color.
In short, white light => yellow image, not smeared rainbow.
Then each of the five of us took turns putting this all into practice. Our heads were swimming with all the steps:
 |
| My object in the Denisyuk box |
- Mount your object in the box (with copious amounts of hot glue for stability)
- Clean the glass that will hold the film
- Turn off lights (turn on safe green lights)
- Find the side of the film with the emulsion (touch it to your wetted lip and find the sticky side)
- Soak the film in TEA, emulsion side up
- Squeegee dry
- Mount the film between glass panes in the box, emulsion side down
- Stabilize the glass with putty
- Prepare the chemicals for developing
- Wait 20 minutes for film and table to stabilize
- Tell stories (very important)
- Lift card blocking the laser for 1 minute to stabilize the table
- Remove card completely and expose film for 10 seconds
- Don't breath, move, or loose count
- Replace card to block laser
- Bring film to dark room
- Agitate in Developer solution for 2-4 minutes until 80% opaque black, emulsion side up
- Rinse in water 5 times
- Agitate in bleach for roughly 5 minutes until clear
- Rinse 5 times
- Soak/rinse in water for 15-20 minutes (roughly 3x the amount of bleach time)
- Soak in Vitamin C solution until brown
- Squeegee dry, check for streaks
- Blow dry until it curls up in the opposite direction
 |
|

 |
| Our ritual story telling area |
 |
| Rinsing off the bleach in the darkroom |
And then if all has gone well, you have a hologram!!
Mine turned out a bit cloudy - We figured out that we think there wasn't enough developer in the tray (mine took almost twice the time it should have to turn black) and not enough time in the Vitamin C, which helps remove some cloudiness.
But all in all, I'm pretty pleased!
My very first hologram!
And one by one we each got them all completed. I was fortunate to go second and get the anxiety of destroying my image out of my system early. However, the last two people's really turned out fantastically as we all started to better understand the process and help each other out.
 |
| Zsofi's pyrite |
| Jeff's blue pseudoscopic buddha (a relief impression of the object, imaged, and then viewed from the "wrong" side, inverting the hologram and making it pop out orthoscopically.) |
Next, Onward to our very own misadventures with the pulse laser, then transferring the pulse masters to holographic prints!
No comments:
Post a Comment