Tagline

The Studio of Eric Valosin

Friday, May 20, 2016

Tiny Books and Fragmented Cyberspace

This summer one of my new projects this year will be touring around the country in a very unique curatorial endeavor. The Creativity Caravan, run by writer/artists Maya Stein and Amy Tingle, is hosting The Tiny Book Show, consisting of lilliputian literature, artist books no bigger than 3" in any dimension.

Nearly 50 venues lined up across 20 states


The call for entry provided an intriguing challenge as I tried to come up with a project that would fit  the criteria but, of course, still cohere with the rest of my practice. With the theme being book-oriented, I went back to the last book I published, my thesis monograph for inspiration. 

For that book I tried to integrate print and digital media using QR codes, in a way conceptually fitting of my explorations of physical and virtual spiritual space. On the back cover I had designed a QR code comprising a Meister Eckhart quote that, when scanned, brings viewers to a random page of a random text that informed my thesis research.

I decided to use that as my starting point for this book as well, figuring the small format would lend itself better to the QR image than to plain text. 


Textual Dividualism

I began thinking about the nature of books as a medium, and how their pages serve to fragment and divide content. If the text were personified, Deleuze's dividual would come into play, with each page being yet another virtual version of the textual self. Given that my QR code destination plays into this idea of random fragmentation, I thought it an appropriate solution to physically fragment the code itself across the many pages.

So I set out to make a book with clear plexiglass pages. Each page would host a fragment of the QR code. When the book is closed, the overlaid fragments would cohere into the complete, scannable code.

As an added challenge, I wanted to make any pair of consecutive pages also compile a complete code. And, by taking advantage of the flexibility built in by the QR code's error correction capability, I could strategically add/remove pixels to make each coherent whole slightly different from each other, but all scan the same.

Sizing up my plexi pages
Scoring and snapping each page

Book Building

The next step was to figure out how to get all the pages to align. I decided I'd drill some holes that I'd use later to bind the pages, but could for now use as a way to align each page over a grid, on top of which I'd draw the QR code.


The next trick would be how to actually inscribe the QR code. I needed high enough contrast to make the image scannable, but as I experimented with various paints and markers, nothing would hold up to the wear and tear of book use without rubbing or scraping off.

I figured I could take advantage of the plexi by engraving the code into it, but would need more contrast than the frosted-glass effect of scratched plexi. So I decided to combine both approaches, scoring the plexi and then rubbing acrylic paint marker into the abrasions. Hopefully that would be both permanent and dark enough to be functional.

Monkish work, crosshatching page after page of QR code etchings


Fully etched page, ready to be colored. A shame, I kind of like the frosted look.

The Moment of Truth

After a couple pages were done, it was time to see if it would actually work or not. This is always the most nerve racking moment of these QR code projects, waiting to see if my hours of labor would cooperate with my initial vision or if it would fall on its face and amount to a pile of dirtied plexi. (for an example of making the most of such a failure, check out my recent Denisyuk Reflection Hologram, in which I attempted to make a scannable, 3D, holographic QR code.)


6 of 8 pages done
With the compiled codes proving to indeed be scannable, I continued scratching a coloring away until all 8 pages were complete. The last part of the equation would be the binding.

This was a tougher decision than I anticipated. Because of the clarity of the plexiglass, any binding would be very much visible, and it had to hold the pages tight enough in place for them to be scannable, but still allow the pages to turn.

Some sort of spiral binding seemed my best bet, but I wanted the material to dialogue with the digital/analog theme. So I decided to treat it as the physical portal to the digital world that it was, and use materials commonly meant for electronic circuitry, copper wire and solder.


Much to my shame, this was actually the first time I'd ever soldered! But it was a good test case, since precision wasn't an issue. And all in all, I'm pleased with the outcome!

Quarter for scale


My makeshift photo-studio for documenting the tiny book, since everybody likes a bit of metanarrative.
Make sure to check the itinerary at the link above and catch the Tiny Book Show at a Gallery/Library/Cultural Center near you!

Sunday, May 15, 2016

My Holographic Universe: Part 5/5 Reflections (and Transmissions)

Lest I leave you hanging, I wanted to take some time to reflect back on my week at the Ohio State University Pulse Laser Holography lab. If you're just tuning in, you can follow my adventure from the beginning here.

Our mentor, renowned physicist Harris Kagan was sure to drill in the major rules of holography:

  1. Two beams - you can't have an image without an object beam and reference beam coinciding on the film and creating an interference pattern.
  2. Stability - nothing can move more than half the distance of a wavelength of light (roughly 300 nm) during the exposure or you get a changing (distorted/destroyed) interference pattern

But there were several more lessons to be learned, which I think are transferrable to other disciplines.

  • Everything matters - whether it's which hand you use to load the glass into the film holder, what brand of squeegee you buy (for the record, the perfect squeegee was formerly found at Bed Bath and Beyond for about $9 but has since been discontinued much to the dismay of the holography community), or what object you're imaging, everything has a purpose and a meaning, and nothing is done without consideration.
  • You can do anything, it just takes time - nothing is off limits, it just might take 8 hours of re-machining parts, building structures, and aligning optics to make it feasible.
  • Well, maybe not anything - there are many inherent limitations to the medium. Fuzzy things and living things move on a microscopic level. No matter how still you are, you'll never be stabile enough for a continuous laser image. Shiny objects just work better. But if they're too shiny they won't work at all. Green objects will never be bright under a red laser. Whatever idea you had, assume you'll be tweaking it. However it's these limitations that provide for many of the most interesting and ingenuitive experimental holograms.
  • It's who you know - nothing new, but the holography community is super close-knit. It's like a secret society or a fraternity, in which everyone knows everyone, and it's a small pond filled with huge fish all swimming shoulder to shoulder. We had visitors drive in from several states over when they heard Sam and Harris would be in the same room, just for a chance to get an autograph and talk lasers. Good ol' so-and-so out in Russia? Yeah, I saw him a few weeks ago. He worked with what's-his-name in Japan, right? Yeah, right before I worked with him in NY. He's married to that woman what's-her-face. Oh yeah, I had dinner with her last month at such-and-such. If you can manage to name drop that one holographer you've worked with, they will know who you mean, and you will feel very important for the next 45 seconds. But when you're in the company of holographers talking holography, prepare to be acutely aware of the fact that you are, for now, an outsider graciously being offered a peek into a strange world full of physics jokes, unpronounceable words, and units of measure you haven't thought about since high school. 
  • There are two types of artists - the kind that want to be holographers and the kind that want you to make holograms for them so they can look like holographers. Holographers can smell a poser from a mile away. For instance, I found out the hard way not to mention James Turrell as one of your holography idols. The holography community has a severe distaste for Turrell, who walks into a lab and pays "real" holographers to make him brilliant things. But if you asked him about beam ratios or how exactly triethylalamine filters out selective wavelengths of white light to develop a colored hologram, he'd likely give you a blank stare. While he gets all the glory as a "legendary holographer" the guy who likely invented all the techniques he's using is sitting in a basement in Ohio getting an autograph from Sam Morée.
  • Give up the Pepper's Ghost - holographers are VERY touchy about the colloquial bantering about of the word "hologram." If I had a dollar for every time it was mentioned that Tupac was not a hologram but merely a pepper's ghost illusion (and that holography is not an illusion - it is real wavelengths of light reaching your eye the exact same way they would if the object were there), I'd be able to afford my own lab. Nor are HoloLens or VR technically holographic technologies. Moral of the story, technicalities matter (see bullet point #1)

The Future

As our week rounded to a close, we had the opportunity to ask Sam over dinner and drinks what he sees for the future of holography. Recognizing this is someone who has been innovating and pioneering holographic techniques for the past 35 or so years, I was hanging on his every word.

He feels that the technology of imaging and developing holograms has largely come as far as it likely can. But he sees great potential in attention to the process of viewing them. New lighting technology and new optics research could really revolutionize the way holograms are integrated into life on both practical and artistic levels.

Thinking within the framework of my practice, I'm looking forward to being able to experiment with my existing holograms on these terms. Activating holograms using digital projection rather than lasers or gallery lights, or playing with projecting holograms from a point or line source seem like  promising places to start.

I still have this sneaking urge to attempt a DIY holography lab, but after seeing the fortune spent on legitimate equipment I have serious doubts about realizing that urge.

And ultimately, I'm excited to dream up a reason to propose a return to OSU for a residency.

From left: Harris Kagan, Miho Ogai, Jaccqui Delaney, Zsofi Valyi-Nagi, Sandra Meigs, Jeff Hazelden, Eric Valosin, Sam Morée
For more info about the HoloCenter and the Pulse Laser Holography workshop and residency program, visit the HoloCenter website.

And should you find yourself in Columbus, I'll share the same advice that was shared with me: Go to Jeni's ice cream. Sample everything (I looked down at one point to find 10 tiny spoons in my sticky, clenched fingers), and ask for pairing suggestions. The ice cream will exceed the hype.


And for the record, ice cream is one of the few things in life that is better off not being a hologram.


<< PREVIOUS POST: PART 4                                                                            |<< FIRST POST                

Friday, April 29, 2016

My Holographic Universe: Part 4/5 (the final two days)

Today marked the last day of the Pulse Laser Holography workshop led by renowned physicist Harris Kagan and legendary holographer Sam Moree that I've been fortunate enough to attend at Ohio State along with 4 other phenomenal artists from all over the continent. After having completed our Denisyuk reflection holograms on Tuesday, we brought it all to a close by developing transmission holograms with the pulse ruby laser and making white light viewable rainbow hologram transfers.

I'm sad to part ways with the excellent group of artists I've become so close with over this last week. It's at times seemed to fly by and at other times felt like an eternity; Waiting in the dark for 20 minutes at a time silently or making small talk, 20+ times a day, being mindful of every second passing by, has a way of distorting time. I'll miss the camaraderie of being an extra set of hands for each other as we regularly oscillated between planned lethargy and crisis mode.

Yesterday had many of those crisis mode moments... 

DAY 4

Inside the pulse studio, Jeff Hazelden setting
up his model for the shoot before mine.
The morning started as any other. We gathered, discussed the game plan, and went into the pulse laser lab to set up our installations, one by one. I was the second person out of the five of us to go, and I decided to make another go at my rock pile.

Harris advised that I find a way to take advantage of the pulse laser's ability to image something moving, so I decided to put my rocks in water, and disturb the water by lifting and dripping some handfuls of it. 

I also built a little plank to sandwich between the rocks, projecting forward to hold a second rock pile in front of the larger one behind. This way it would jut forward more in the image and seem to be floating. (and no, I didn't cheat with hot glue. In the spirit of true rock balancing, it's all actually ready to topple at any moment. And often did.) The next step was to fill it with water and practice timing our dripping.


When it was my turn in the lab we carefully disassembled and transported all the components. The we began setting it up, using the mirror as a standing for the film, as a way to line up our composition, raising and lowering the platform with shims and 2x4s, and then carefully loading in about 3 gallons of water by the coffee mug-full so we wouldn't spill water on any of the optics.

Crisis number one came when it slowly occurred to us that the felt strips we used to mask the edges of the tray were wicking the water out of the tray and gradually flooding the floor of the lab. Lasers and water are not a good thing. On top of that, dripping the water would cause us to potentially get in the way of one of the mirrors.

We decided to simply agitate the water with our hands and then jump out of the frame as quickly as possible, and hope there wasn't too much water on the ground. Frantically, we got it all ready.

3 - 2 - 1 - FOOMP!

20 nanoseconds later it's all done.

We even more frantically (but VERY carefully) cleaned up the flooded floor, and dismantled the installation. 

Crisis two came later when someone nearly destroyed another person's hologram by accidentally turning on the yellow lights in the dark room before it had been bleached, which could expose the film and wash out the image. Luckily, somehow, the image wasn't harmed. 

After a very stressful morning of close calls, Harris urged us to break for lunch to recompose ourselves.

...That's when we got the alert about the shooter. 

An armed home invasion that sent two people to the hospital just off of campus, and the perp was on the loose. The school went on lockdown, so we hunkered down in the darkroom with the doors locked, and used the time to develop some film.

Webster developer heated to 104º (stronger and more caustic than the D19 we used for the continuous wave lasers) for about 4-5 minutes, water rinse, bleach, back to the water for 20 minutes, then squeegee and blow-dry. 

We got the notice that the lockdown had been lifted, and my hologram was ready to be viewed.


The setup was a little too high so that from the vantage point of the film you could barely see the water, (which was not nearly as agitated as I 'd hoped) but otherwise it was a really successful shoot.

Each of our holograms got better and better as we went along, and the crises became fewer and farther between.

Eventually, we all finished up, and had some really spectacular masters from which we'd make 4x5" transfers. Sam began setting mine up to be first up for the transfer the next day.

Lining up the master on the front plate to be projected onto the rear plate with a line source (i'll explain below), where the film would be.

The projected image (sideways)
We finished relatively early (that is, not late), and I got back to my host's house just in time for a really great, small party thrown somewhat in my honor. Conversation ranged from holography to foodies to pinball machine repair, to defecation performance art, and I was stunned that not a single one of those topics was any less technical or conceptually rich than any other!

DAY 5

Today we returned for our final day. I was first up for the transfer. The way it works is this: Since every point on the hologram contains all the information for the light scattering off that object and going to that point, you can shine a point source laser through the hologram and end up projecting the entire scene onto the wall. As you move the point around, the vantage point of the projected image moves around accordingly.

Lines and Rainbows:

Instead of shining a point, if you use a cylindrical optic to spread the laser into a line, that line will project the whole image (as seen above) and it will retain all the info for all the vantage points along that line. That gives you a projected image that you can walk past and get the 3D parallax effect. On top of that, the slit aperture of the line source causes white light to spread, creating a rainbow hologram when viewed in white light.

Then, by calculating the focal distance for each 3D portion of the image, you can place the film in the right location to get the transferred image to appear to sit anywhere in space you'd like in relation to the film.

In mine, the rear rock pile sits behind the picture plane (what's called a "virtual" image because it's focal point occupies space that does not physically exist), while the front rock pile appears to just out in front of the picture plane (a "real" object with a focal point in real space in front of the image)

You're then essentially taking a holographic image of a projected holographic image, using that projection as the object beam that mixes with the reference beam to create the interference pattern.

Exposure

Since the optics were already set up the night before (see diagram), all we had to do was fine tune some things, turn off the lights, and load the film between the panes of glass on the rear part of the projection apparatus. 

The trick was simply to pick the right spot for the film, since our "window" would be shrinking from 5x14" to 4x5"

Then we wait 30 minutes for it to settle and become stable, tell stories, and figure out our game plans for the exposure - set the timer, lift the card blocking the laser off the table for a minute, uncover the beam entirely and try not to move, breath, or make any sounds, and pray the construction workers upstairs don't decide to start hammering, and watch for 2.5 minutes, then cover the beam again.

Development

Then it's off to the darkroom. It was pretty cool to actually get to the point where we felt we could handle it all by ourselves, without Sam or Harris looking over our shoulder. We all helped each other remember all the steps, and we all had enough experience by this point to be able to coach each other through any minor problems.

And ultimately it turned out fantastically. The only issue was a mysterious streak across the top of the image, but the hologram still developed, meaning the streak couldn't be from a messy object beam. We couldn't find anything in reference beam that could be causing it to overexpose. I thought I might have somehow exposed my film while loading it, but when we saw the same line in everyone else's film too we deduced the it was actually a defect in the roll. Big bummer for the roll, but it was reassuring to me!

Viewing

Since these are transmission holograms (meaning both the object beam and the reference beam collide on the same side of the film) they need to be illuminated from behind (with what's called a "conjugate beam") in order to be viewed. That's why transmission holograms that are hung on walls are actually mounted on mirrors, because it reflects the front mounted lighting back out as if it were coming to the viewer's eyes from behind the film.

Once it was mounted up, we took a look in the white lights, and voila!


I was extremely proud of all of our holograms, and perhaps even more so with everyone's patience through all the waiting, crises, and confusing physics lessons. Tomorrow, after a good night's rest, I suppose I'll take a moment to reflect back and wrap this all up into a nice tidy bow.

But for now, it's time to get some sleep on my last night in Ohio before making the trek back to Jersey in the morning. It's been quite a ride!


<< PREVIOUS POST: PART 3               |<< PART 1                     NEXT POST: PART 5 >>


Wednesday, April 27, 2016

My Holographic Universe: Part 3/5 (My first hologram!)

It's now the end of day 3 of the Pulse Laser Holography workshop at Ohio State. I'd have posted yesterday for day 2, but the days have essentially just bled together into one long super-day.

It started like this...

DAY 2

We started the morning with more theory: transmission vs. reflection (whether the object and reference beams hit the same or opposite side of the film), how the silver emulsion works (grains of silver standing up when light hits them), the optics themselves (mirrors and lenses accurate to within a 10th of the wavelength of light!), film resolution (3,000 grains per cm! That's equivalent to a 4x5 photo with a gigabyte of data stored in it!)...

After a while my brain started to feel like the whiteboard in the lab:


And just when I thought I had finally gotten a handle on it, Sam or Harris would say something that totally undermined the understanding I thought I had. But eventually (I think) we started tracking with them, just in time to get some first hand experience.

We went 2 doors down to the pulse laser. As a frame of reference, our first demo with the smaller helium neon laser on Day 1 required a 4 minute exposure. The ruby pulse laser is so powerful it needs 20 billionths of a second to do the same thing!

We decided on a group pose trying to chew gum and blow bubbles in each other's faces. After countless trial runs to get the timing down (like getting a group to all jump in the air for a photo at the same time), we set up the laser and got ready for showtime...

...And failed miserably. Only 2 people had viable bubbles, and they were mostly out of the focal area. But at least we got a nice shot of us making awkward faces at each other!


Test viewing while still wet. I never got a video of the final mounted version... maybe tomorrow. That's me in the bottom right corner, just after the premature bubble pop.

After developing the film using a whole bunch of processes and chemicals that wouldn't make any sense for another day or so, we broke for lunch (more like dinner at that point), and then rounded the day off with a lecture from Sam about his artwork and role in the history of art holography since the 70s. We were joined by OSU's beginner holography class.


DAY 2.5ish

That night, (after a bit of a diversion forgetting where I parked and spending an hour scouring the wrong parking lot) it was time for me to build the object for the next day's Denisyuk hologram, which had to fit within a 5x7x1.5" box.

I had gotten all the supplies earlier that morning, and the plan was to construct a 3D scannable QR code using nails in a wood board (pinpression style). I thought it would be really interesting to be able to move around this topographical, waveform/interference-pattern-like image that coheres into a QR code at just the right angle, then scan a hologram with your phone and be sent to a website.

This did not go how I planned.

First, the wood was too thick and wouldn't fit in the box. So I had to use my little hand saw to plane it in half! 

Amazingly, that's the one part of this that did work, though it took me about 2 hours.

And in case you were curious, the sound of a saws-all through wood apparently sounds just enough like a frog's mating call to attract visitors!

My pet frog for the moment, who hung
out next to my chair watching me saw!
The problems started to come after I hammered in the first row of nails.

It quickly became apparent that hammering in a nail butted up agains another nail at varying heights (which mean snipping the nails to make them shorter) was not going to be easy with a big, clumsy hammer. I figured out a method that worked using a hole punch to extend the nail, but getting them all at the right angle and location proved quite a challenge.

It also became quickly apparent that I'd need about a week to get this thing finished, and it had to be ready in about 9 hours. 2:00 am. and I had about 2.5 rows down, 23.5 more to go...


I abandoned plan A, figured I'd call it a night, get up early and start sloping the nails down toward the surface, and just draw the rest of the code.

However, with the wonky gridlines started by the uncooperative nails, this got real sloppy real fast.


And even in its best moments, it was simply not scannable. Which also meant it had a 0% chance of being a scannable hologram. Goodbye, plan B.

So I decided to turn it into a meditation on my frustration with the uncooperative materials. I'm thinking of calling it "Meditation on Disrupted Meditations" or "Deconstruction of a Failed QR, Reconstructed"

I added a bunch of leaning and toppling screws, chewed up some of the edges, and glued down my two least cooperative tools.

If it wasn't going to be strong conceptually, at least it would make for an interesting object!


...And it Did! DAY 3

That brought me right up to the start of class where we'd be imaging our objects. The Denisyuk is a reflection hologram named for its inventor, in which  the reference beam passes through the film to the object behind it, reflects off the object and bounces back, hitting the back side of the film with the object beam. This changes the orientation of the interference pattern, and allows it to be illuminated from in front (i.e. gallery lighting).

This, only we added a mirror rather than a direct path to the beam expander.

Of course we started off the day with more theory: learning about how path length differences can be used to selectively interfere with and cancel out all but a desired wavelength within white light. This lets the hologram be viewed with white light instead of needing a laser.

When the white light reflects off the film, ordinarily it would separate into a smeared rainbow. But with a chemical called TEA (triethylalamine), you can make the emulsion thicker, changing the path length of the transmitted and reflected white light. Then, when you remove the tea and the film shrinks back down, you've effectively cancelled out all the wavelengths except the one you want - any given color.

In short, white light => yellow image, not smeared rainbow.

Then each of the five of us took turns putting this all into practice. Our heads were swimming with all the steps:


  • Setup the table and align the lasers (this was done for us from prior days)

  • My object in the Denisyuk box
    • Mount your object in the box (with copious amounts of hot glue for stability)
    • Clean the glass that will hold the film
    • Turn off lights (turn on safe green lights)
    • Find the side of the film with the emulsion (touch it to your wetted lip and find the sticky side)
    • Soak the film in TEA, emulsion side up
    • Squeegee dry
    • Mount the film between glass panes in the box, emulsion side down
    • Stabilize the glass with putty
    • Prepare the chemicals for developing
    • Wait 20 minutes for film and table to stabilize
    • Tell stories (very important)
    • Lift card blocking the laser for 1 minute to stabilize the table
    • Remove card completely and expose film for 10 seconds
    • Don't breath, move, or loose count
    • Replace card to block laser
    • Bring film to dark room
    • Agitate in Developer solution for 2-4 minutes until 80% opaque black, emulsion side up
    • Rinse in water 5 times
    • Agitate in bleach for roughly 5 minutes until clear
    • Rinse 5 times
    • Soak/rinse in water for 15-20 minutes (roughly 3x the amount of bleach time)
    • Soak in Vitamin C solution until brown
    • Squeegee dry, check for streaks
    • Blow dry until it curls up in the opposite direction

    Sam helping me mount my object (left) - Really
    an honor to get to work with him;
    Aligning the laser (above): 


    Our ritual story telling area

    Rinsing off the bleach in the darkroom

    And then if all has gone well, you have a hologram!!

    Mine turned out a bit cloudy - We figured out that we think there wasn't enough developer in the tray (mine took almost twice the time it should have to turn black) and not enough time in the Vitamin C, which helps remove some cloudiness.

    But all in all, I'm pretty pleased!

    My very first hologram!

    And one by one we each got them all completed. I was fortunate to go second and get the anxiety of destroying my image out of my system early. However, the last two people's really turned out fantastically as we all started to better understand the process and help each other out.

    Zsofi's pyrite

    Jeff's blue pseudoscopic buddha (a relief impression of the object, imaged, and then viewed from the "wrong" side, inverting the hologram and making it pop out orthoscopically.)


    Next, Onward to our very own misadventures with the pulse laser, then transferring the pulse masters to holographic prints!


    Monday, April 25, 2016

    My Holographic Universe: Part 2/5


    Arrival

    Windows a la Finch
    After 8 hours of blue skies and puffy clouds along I-80, I arrived for the Pulse Laser Holography Workshop in Columbus, Ohio yesterday evening, graciously being hosted by my MFA compatriot Brian Haverlock and his hospitable friend Lorelei.

    It was fantastic to catch up with Brian, the monk-turned-psuedo-apostate-performance-artist whose reverently irreverent assemblages and performative personas toe the line between the sacred and the profane. As we sat down to a burger and some beers, our theological conversations seemed a fitting beginning to this adventure.

    I soon settled into my air mattress at my host's quaint one-bedroom apartment. I couldn't help but be a little jealous of its monkish minimalism, and I appreciated that her windows looked like Spencer Finch installations. A much needed retreat from the clutter of this year.

    Day 1

    It wasn't long before morning came and I was off to campus to meet up with the other artists, a really fantastic group of people:

    Szofi Valyi-Nagy (Chicago),
    Miho Ogai (New York),
    Sandra Meigs (Canada),
    and Jeffrey Hazelden (Ohio)


    We began in a lecture room, learning the history and science behind the medium from some of the foremost authorities in the world.

    Sam Morée, the serious, soft spoken cofounder of the NY Holographic Laboratories and a pioneer of art holography in the 70's, with hair somewhere between Einstein and Warhol was accompanied by Harris Kagan, a tall, good humored, slightly scattered and nervous seeming professor of holography who is one of the team of physicists responsible for the discovery of the Higgs Boson at CERN.

    These guys are no joke.

    ...Well, except when they are, squabbling like an old married couple over the preferred color of a flashlight, or talking over each other to reiterate a point. Entertaining foibles aside, the wealth of knowledge and experience between them is staggering.

    After a thorough briefing, we were escorted into the labs for a tour of the equipment and a demonstration of combining laser beams to produce an interference pattern. (This, by the way, is essentially how they used the technology in CERN, Harris explained, noticing  simultaneous changes in interference patterns due to gravitational shifts from a cosmic event across a 2 mile long beam length.)
    Sam and Harris setting up an interferometer to explain and calibrate the parts -
    beam splitters, spacial filters, mirrors, beam spreaders, all that good stuff.


    Standing wave interference patterns.
    Remember the Double slit experiment that helped discover Quantum Mechanics?

    Our First Hologram

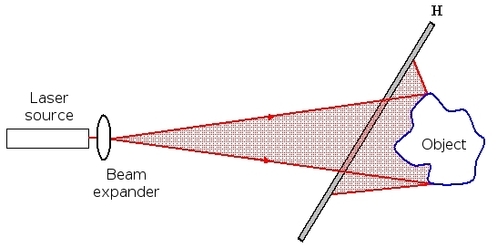
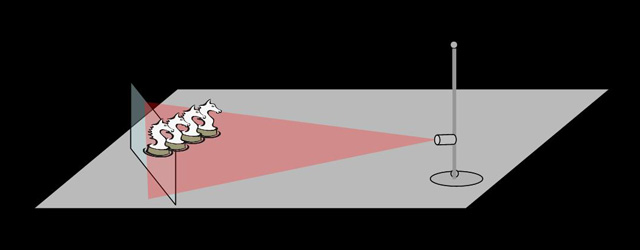
    Sam and Harris walked us through an "In-line" transmission Hologram, in which a single beam is used: 

    After being spread, part of the beam shines directly on the exposure and the other part shines on a lineup of items to be imaged, reflecting off of them onto the exposure. The two parts of the beam (the "reference" beam directly from the laser and the "object" beam reflecting off the objects) mix to create an interference pattern on the exposure that's unique to the way the light hits those specific objects. 


    You can later shine a laser with the same wavelength on that recorded image, which constructively interferes with the recorded interference pattern and reconstructs for your eye the light as it was seen reflecting off the objects - what our eye sees as the 3D hologram of the object.

    STEP 1: Lunch 

    After a brief max exodus to a Korean restaurant for lunch, Harris led us in setting up the table. He took light readings to plan the location of the exposure within one side of the beam to optimize the beam lengths and ratios (between the object and reference beam's brightnesses), and then we placed our objects in the path of the other side of the beam.


    Any hopes of a conceptualism were tossed out the window as we learned why most of the objects we had brought would not image well. We also learned quickly that any answer we provided to what we thought was an intuitive rhetorical question would be the wrong answer, and most of his questions were meant to be intuitive and rhetorical. We've got a long way to go...

    Turns out that because of the red light, anything green or less reflective gets imaged as black, anything transparent acts as another optic that potentially distorts the beam, and any movement at all (on a microscopic level) will result in no image.

    In this case we started with my pile of rocks, which were quickly deemed uncooperative by their general instability and tendency towards chunky occlusion shadows falling in the way of the other objects.


    As everyone else added their objects I scanned the lab's table of nicknacks for a suitable replacement. "Captain Pepper," the porcelain pepper shaker was my stand in, until Harris inadvertently toppled him over, demoting him to the Headless Captain Pepper. With his proud, now disembodied captain head prominently displayed on a pole for all to see, we continued aligning the objects. Well, as he said earlier, "broken things make for much more interesting holograms."

    The headless captain and some his companion objects.

    Step 2: Tell stories... seriously though. That's step two.

    Once everything's in place, the lights go off and the film goes in the holder (It's just like photographic film, but much denser resolution of silver particles in the emulsion, and sensitive to red neon light).

    Then we wait. 20 minutes to let the wood of the frame settle, to make sure that absolutely nothing is moving. With the strength of light we had, it would take a 4 minute exposure. 

    In those 4 minutes, nothing could move more than 300 nanometers. That's roughly 1/50 the thickness of a human hair! Otherwise, no image! Even breathing or speaking caused enough vibrations to wiggle our test interference pattern, and that's using a $30,000 vibration dampening table!

    So we spent those 20 minutes going around and telling stories, waiting for everything to settle. It was a great way to get to know each other, and build artistic community and camaraderie, actually.

    Hard to see, but this is the object beam reflecting off the objects,
    as viewed through the window where the film would go.
    Step 3: Holding Your Breath

    Then finally we set a timer and I got to volunteer to hold the black card blocking the laser out of the way for 4 minutes while praying I wouldn't sneeze. 

    This allowed the laser to shine on the objects and on the light sensitive film. After 4 minutes I replaced the card in front of the laser and on we went.

    Step 4: Development

    All that was left was to develop the image, darkroom style.

    Acid for a few minutes, water rinse for a few minutes, bleach for a few minutes, back to the water, and eventually we had a clear transparency that contained in it all the information of all the light that makes up our visual experience of those objects, from every possible reflected viewing angle, to a microscopic level of detail.

    Our completed, developed exposure.
     All you need is a laser to make it come to life.
    Really hard to photograph in the dark with my iPhone, but heres the hologram you see when you shine a laser at our film, viewed with the laser. Imagine looking through a window and seeing the objects you set up. As you shift your perspective the objects move in kind.

    Tomorrow

    We'll be testing out the big kahuna, the Ruby pulse laser, of which there are only a handful of in the world. It's so powerful that it could do our 4 minute exposure in about 1 billionth of a second, completely eliminating any care for object stability. You could throw something and still image it. Our cells don't even change that fast (the human biological rhythm is apparently in the order of a few hundredths of a second). 

    We'll be imaging ourselves as a holographic group portrait!

    We'll also be using a second setup to make "Denisyuk Reflection Holograms," which are another type of in-line hologram using the weaker helium neon laser. The beam passes through the film on its way to the object (with a shallow depth of field) and the reflects off and bounces back to the film. The beams meet in the middle on the film and create the interference pattern.


    So the next task is to scramble to find materials to image that are diffusely shiny or bright red/white, with interesting dimensionality, and that fit into a 4x5x1.5 inch box... Reminds me of grad school as we all collude to carpooling to hit up thrift stores and find trinkets and materials to misuse!

    The box I have to fill with objects for the next hologram
    Eventually we'll be developing individual projects for the Pulse Laser, creating a laser-viewable master, and then transferring them to holographic prints viewable in white light. Maybe I'll try my rock pile again then. Onward to Day two!


    << PREVIOIUS POST: PART 1                                             NEXT POST: PART 3 >>


    Friday, April 22, 2016

    My Holographic Universe - Part 1/5

    Tomorrow I will be embarking on one of the most exciting studio escapades I've had, and I'll be chronicling my journey here.

    This year has been very eventful for me so far. Besides my first semester adjuncting and many side projects, I think I had more exhibitions lined up in January than I did all of last year, many of which I have not had a chance to write about yet. I'll get to that soon, but in the meantime...

    Tomorrow I leave for the mythical land of Columbus, Ohio to partake in a weeklong Pulse Laser Holography workshop at Ohio State University!

    I'm exceedingly fortunate to have been one of 5 artists from around the world selected to play with lasers, beam splitters, emulsion plates, and all sorts of other magical stuff as I learn how to make holograms (not the peppers ghost Tupac kind, nor the shiny credit card/baseball hat sticker kind, we're talking real 3D images projecting form 2D surface holograms here!)


    This workshop will give me a taste of the medium and enable me to apply for their residency program in which I can realize a full project/body of work.

    If you're wondering where holograms enter into my techno-sublime, relationally metaphysical art practice, my proposal sheds some light:

    Workshop Statement 
    I’m interested in holography as a technologically mediated expression of the sublime, and a connection between the physical and virtual. In my artwork I have used light and projection to suss out the potentials of mystical experience since the advent of cyber/virtual space, now that postmodernism has put classical metaphysics through the ringer. I became aware of holography as an artistic medium in graduate school in 2012 as I searched for ways to use light and new media to augment our perception of our surroundings and extend our presence into new non-corporeal spaces in a bodily interactive manner. I visited the New Museum’s “Pictures From the Moon” holography exhibition including works by James Turrell, Bruce Nauman and others, and I began to see holography as a perfect representation of the mystical notion of “formless form.”  
    Around that time I began creating mandalas - pseudo-architectural images that can be read meditatively as cosmological diagrams - conflated with functioning QR codes as a way to contemplatively interface with the virtual. In my research, I found mandalas are actually traditionally thought of as a sort of hologram. One website notes:
    Very many people have the mistaken notion that you actually visualize these two-dimensional designs. Nobody visualizes these two-dimensional designs, so everyone visualizes three-dimensional buildings on this two-dimensional picture. It’s merely like an architect’s blueprint for the building.
    Or, if any of you are familiar with science, it’s a little bit like a hologram. For a hologram you have a two-dimensional film that contains all the information of a three-dimensional image, and if the light hits that film in a certain way, you get a three-dimensional hologram, just like that.
    Here, mandalas and sacred imagery begin to dovetail with the emerging Holographic Principle in physics, which posits that all the information that comprises the whole universe is actually contained on the two dimensional surface surrounding the outer edge of the universe, which is then “projected” inward much like a hologram to become the multidimensional world we experience. 
    As virtual and physical space intermingle and the worlds of cosmology, physics, and metaphysics all converge on the notion of a hologram, holography has become an irresistibly rich medium for my practice. 

    If you're interest is as piqued as mine, here is a lecture the HoloCenter recommends as a primer to the topic. More tomorrow, as I chronicle my journey!